
From Prompt to Puppy: How AI Image Generation Works
A look under the hood of image models, using a simple Z-Image-Turbo workflow in ComfyUI.
In this article
The short version
When you ask an AI image system for a cute puppy, it can feel like the model simply reads the sentence and draws a picture. That is not really what happens.
A modern image model usually works like this:
- A text encoder turns your prompt into numerical meaning.
- The model starts with noise in a compressed latent space.
- A sampler decides how the model moves from noise toward structure.
- The generative model predicts a useful direction at each noise level.
- A VAE decoder turns the final latent result into visible pixels.
Quick mental model
Our example: a cute puppy in ComfyUI
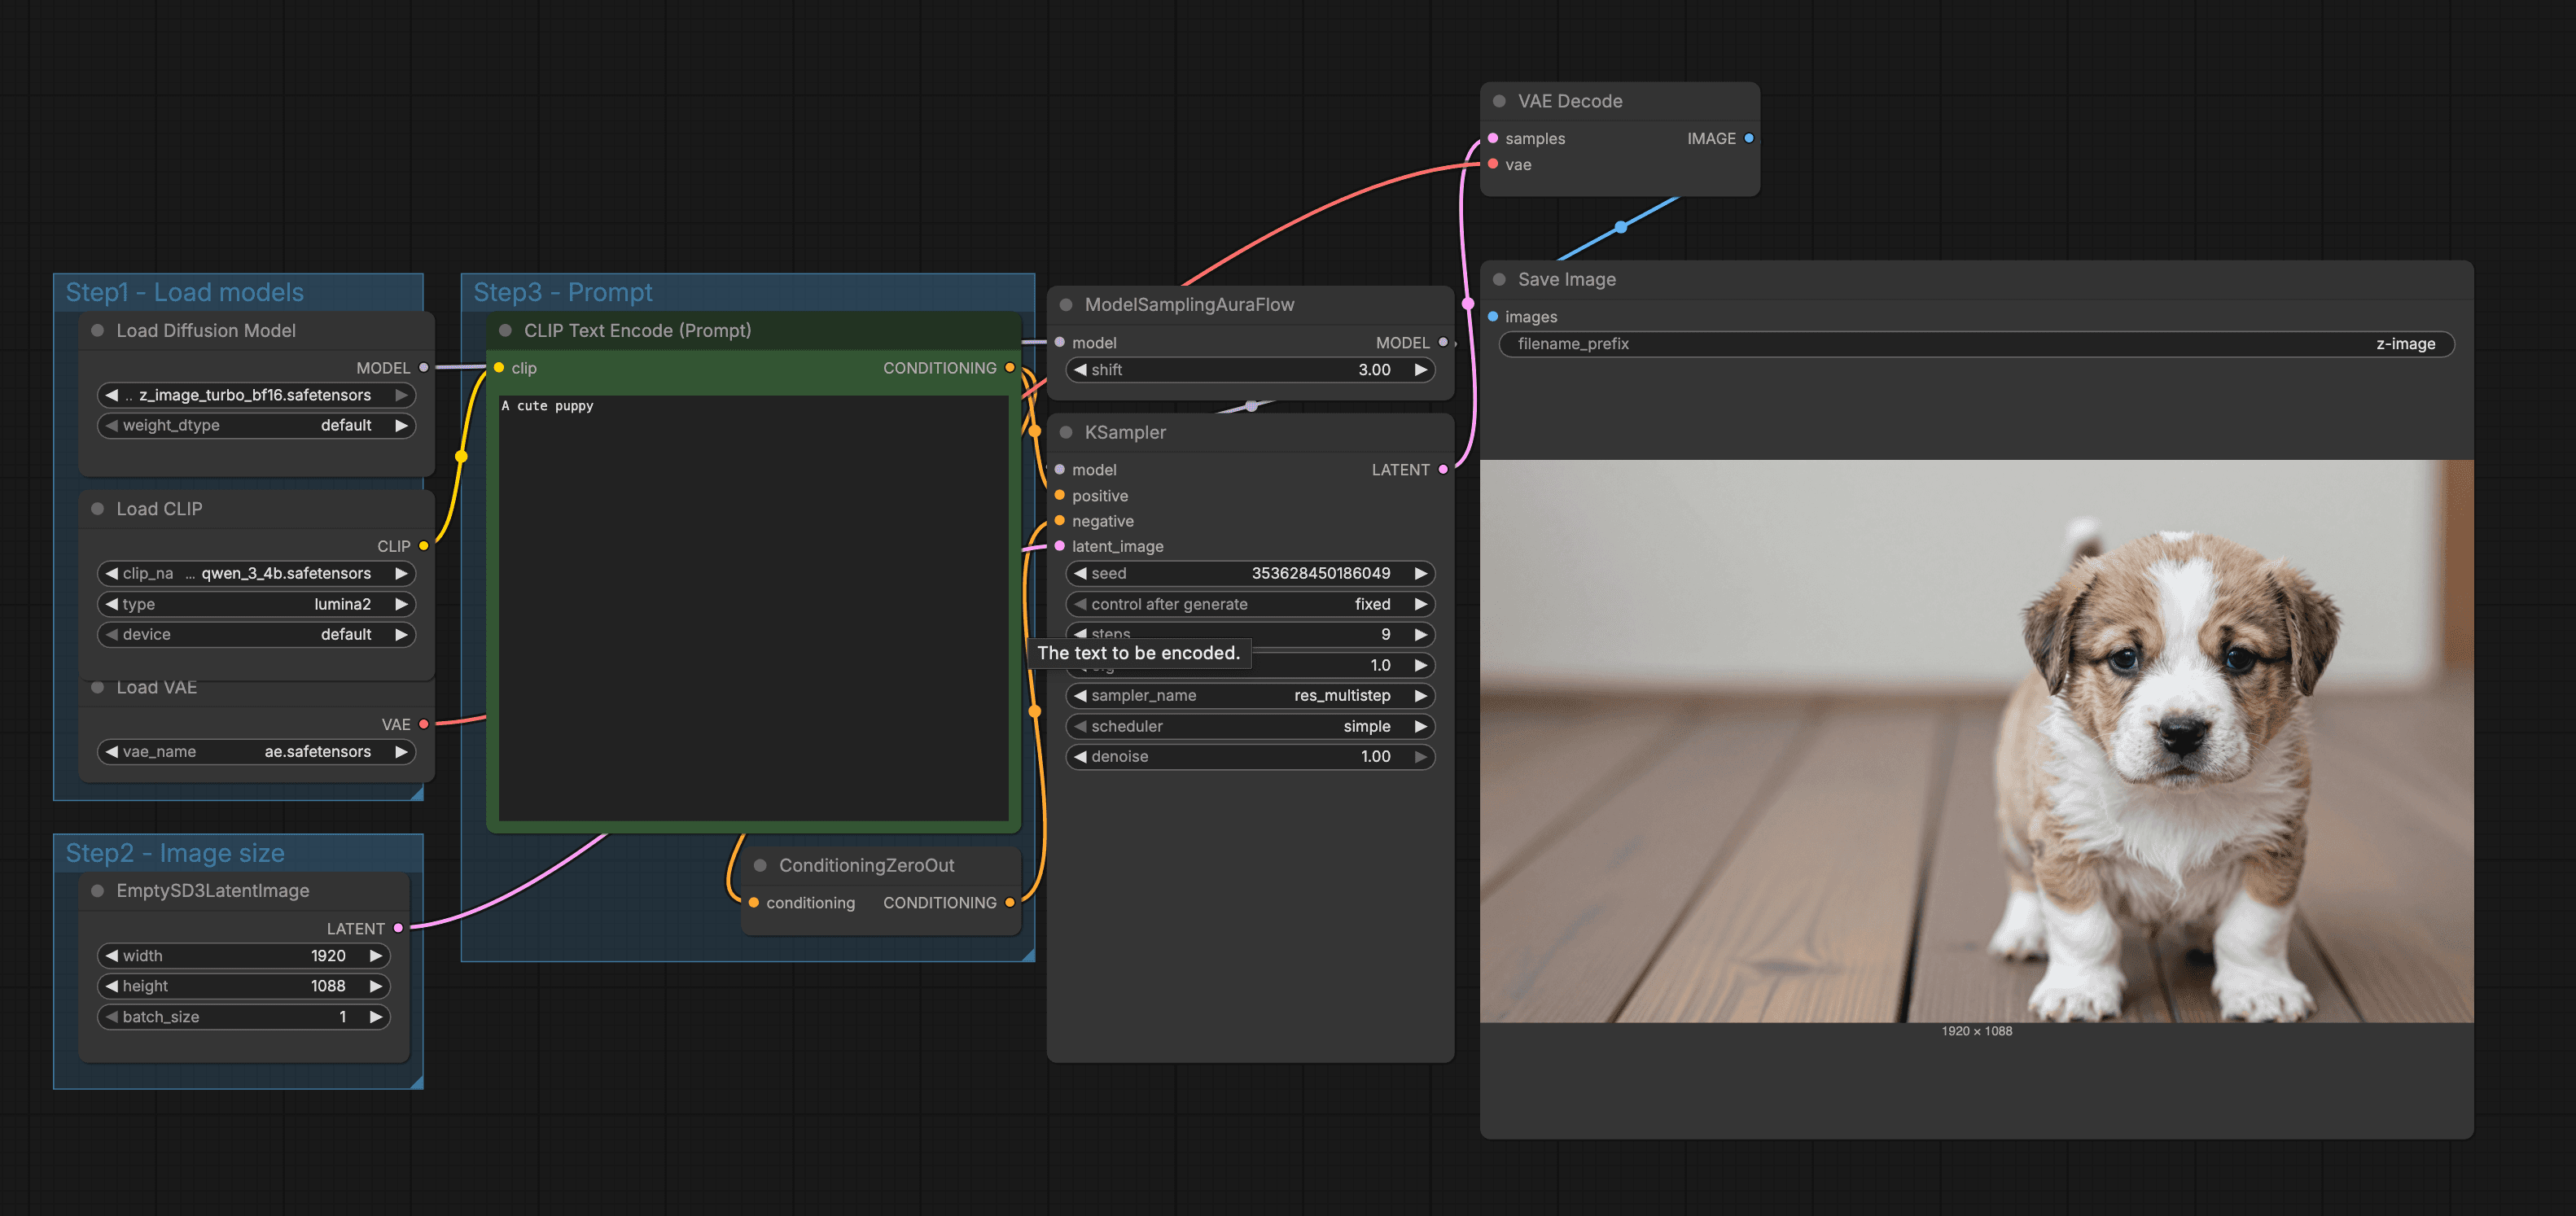
In the ComfyUI workflow, we generate one image from a tiny prompt: A cute puppy. The output looks simple, but the workflow shows the whole chain.
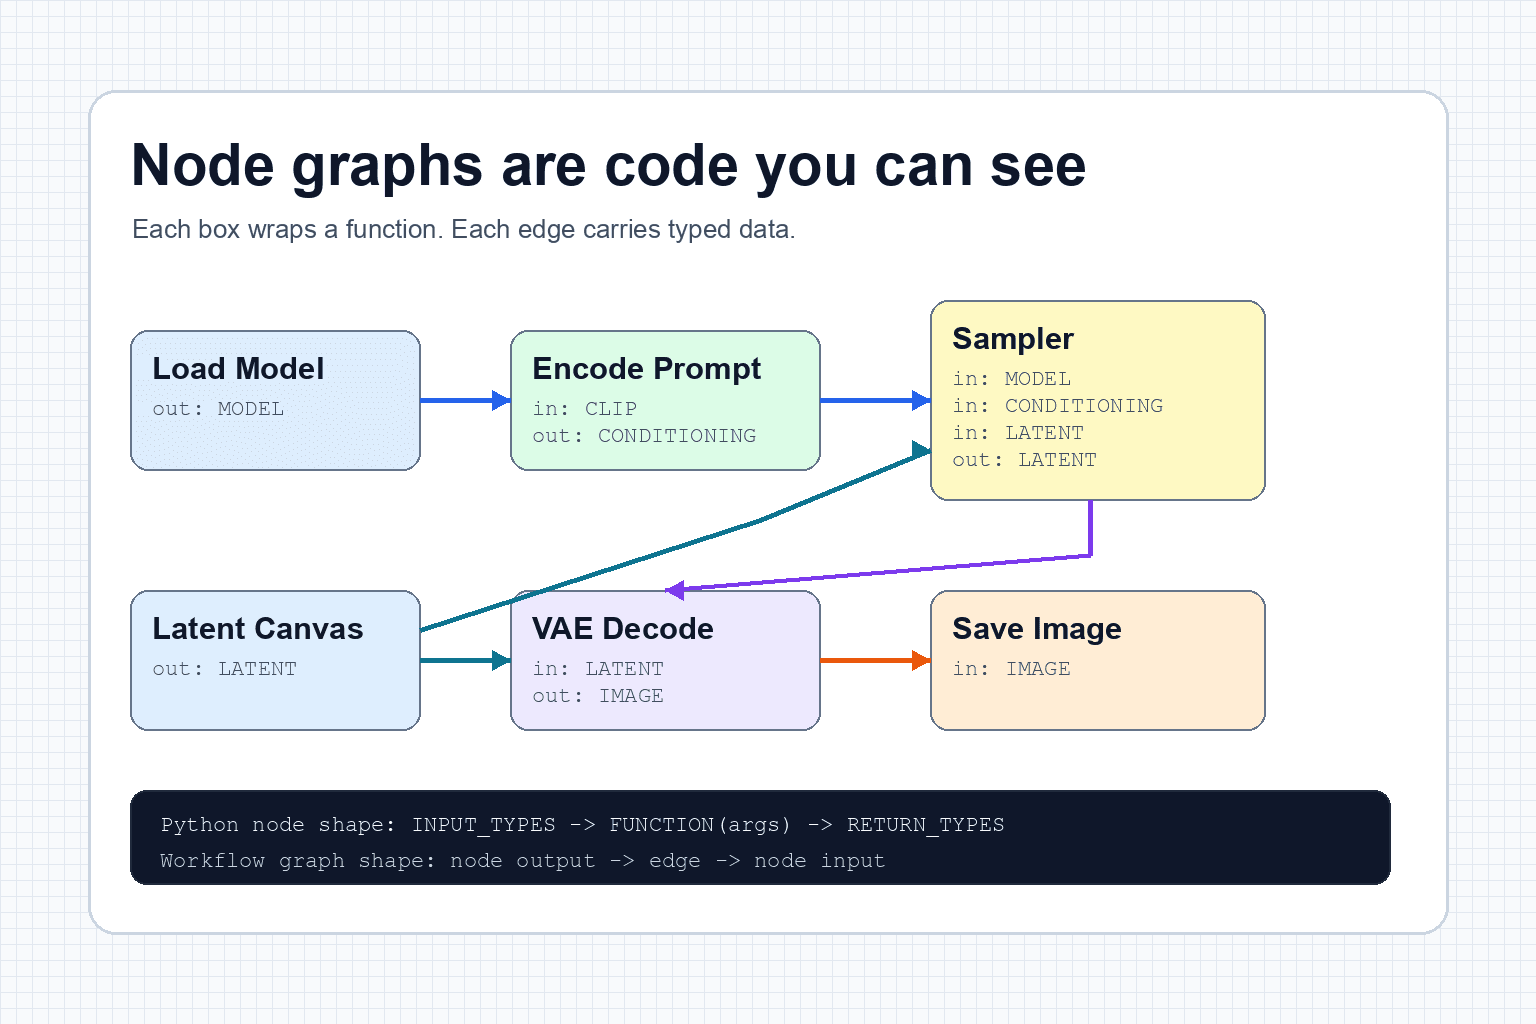
- Load Diffusion Model: loads Z-Image-Turbo. This model has learned what visual patterns often match words like puppy, cute, fur, paws, eyes, and floor. The prompt text has not been read yet, and no puppy image exists yet.
- Load CLIP or text encoder: loads the model that knows how to turn text into conditioning. The ComfyUI node keeps the historical name
CLIPLoader, but this workflow actually loads a Qwen3 4B text encoder through ComfyUI's Lumina2 integration. This is the part that will later readA cute puppyand convert it into numbers the image model can use. - Load VAE: loads the decoder that can translate a finished latent into visible pixels. Think of it as the final translator. It does not decide what the puppy should look like. It helps turn the hidden puppy representation into an actual image at the end.
- Empty latent image: creates the starting canvas in latent space at the chosen resolution. This is not a blank white puppy picture. It is the hidden working space where noise will be shaped into a puppy-like structure.
- Text encode prompt: turns
A cute puppyinto conditioning data. After this step, the system no longer works with the English phrase directly. It works with numerical meaning that says, roughly, move the image toward a cute puppy. - KSampler: combines the model, the prompt conditioning, the seed noise, and the empty latent canvas. This is where the hidden image-in-progress is repeatedly changed from random noise into a latent that contains puppy structure, fur, eyes, paws, floor, and lighting.
- VAE Decode: converts the final puppy latent into visible pixels. This is the first moment the hidden puppy becomes an actual viewable image rather than a compressed internal representation.
- Save Image: writes the decoded pixels to a file. At this point the puppy is no longer just text, conditioning, or latent data. It is a normal image file the browser can display.
ComfyUI is useful because it makes the machine visible. A chat interface hides most of this. That is convenient, but less educational.
The important thing is that every box has a job. Some boxes load learned weights. Some boxes prepare numbers. One box runs the sampling loop. One box turns the final latent back into an image. The puppy is not created by one prompt box. It is assembled by a chain of small mechanical steps.
How an image model is trained
Before a model can generate a puppy, it has to learn what visual patterns tend to match words like puppy, cute, fur, paws, eyes, floor, photo, and soft lighting.
Training usually involves large, filtered collections of images paired with text descriptions. Those descriptions may come from human metadata, alt text, or machine recaptioning, and their quality matters. The model is shown images, text, and sampled noise levels. In classic diffusion training, it learns a task that sounds strange at first: given a noisy version of an image, predict the noise that was added.
Newer systems can use related targets, such as velocity or flow, rather than literally predicting added noise at every step. The practical idea is similar: the model learns how to move a corrupted visual state toward a cleaner one that matches the conditioning.
That training game becomes powerful. If a model gets very good at recognizing which direction the noisy state should move, it can later start from pure noise and walk backward toward a clean image.
Where gradient descent enters
For text-to-image models, the caption matters too. The model is not just learning how to clean noise. It is learning how to clean noise in a direction that matches language.
Modern systems do not all use the same target. Some predict noise, some predict a clean sample or a velocity-like quantity, and flow-matching systems learn a vector field that transports a noisy distribution toward the data distribution. Z-Image belongs to this newer flow-style family, which is why the most accurate general statement is that the network learns a direction through a noisy visual state, not that every model literally predicts identical Gaussian noise.
Training is expensive because the model does this many times. It guesses, measures how wrong the guess was, nudges its internal weights, and repeats. Over time, those tiny corrections become a learned sense of visual structure: where eyes usually sit on a face, how fur catches light, what a wooden floor tends to look like, and how the word puppy relates to all of that.
What the text encoder does
A prompt like A cute puppy is not sent into the diffusion model as plain English. The text encoder turns it into embeddings, which are long lists of numbers that represent meaning.
Those numbers act like a steering signal. The phrase points the model toward puppy-like, soft-looking, friendly visual concepts.
First, the text is split into tokens. A short prompt might become only a few token pieces. Then the text encoder converts those tokens into vectors. A vector is just a row of numbers, but nearby directions in that number space can represent related ideas. Dog, puppy, fur, pet, and cute do not become pictures yet. They become coordinates the image model can use.
Meaning coordinates
This is why prompt wording matters. Puppy points somewhere different from dog. Cute puppy points somewhere different from wet angry dog. Studio photo of a golden retriever puppy points somewhere more specific again.
It is also why prompt order and extra words can matter. The text encoder does not only count keywords. It builds a context. A cute puppy on a wooden floor is a different instruction from a wooden puppy on a cute floor, even if many of the same words appear.
What latent space means
Latent space is a compressed working space. The model usually does not work directly with every final pixel. Instead, it works with a dense representation called a latent.
A latent is not an image you can look at. It is more like a bundle of visual instructions that still needs to be decoded.
This compressed space is one reason modern image models are practical. It is cheaper to solve the denoising problem in a smaller working space than to push every full-resolution pixel around at every step. The model can reason about structure first, then the decoder can translate that latent structure into visible pixels.
- The VAE encoder can compress an image into latent space.
- The VAE decoder can expand a latent back into visible pixels.
- In this text-to-image workflow, we start with an empty latent and decode only at the end.
Compressed workspace
In our puppy workflow, the empty latent image is the blank working canvas. The seed fills that canvas with repeatable noise. The sampler and model then reshape that noise until the latent is ready for the VAE decoder.
How the model works after training
Once the model is trained, generation starts from noise. At the beginning, the latent image is basically static. It has no puppy yet.
The model then repeatedly asks: given this noisy latent, the current noise level, and the prompt conditioning, what should be removed, predicted, or changed?
Each step makes the latent slightly less random and slightly more image-like. Large structure tends to form early. Details tend to sharpen later.
What changes during denoising
The sequence below comes from one nine-step schedule with the prompt, seed, model, resolution, sampler, scheduler, and total step count held fixed. We stopped the same deterministic trajectory after steps 1, 3, 5, 7, and 9, then decoded each partial latent with the same VAE.
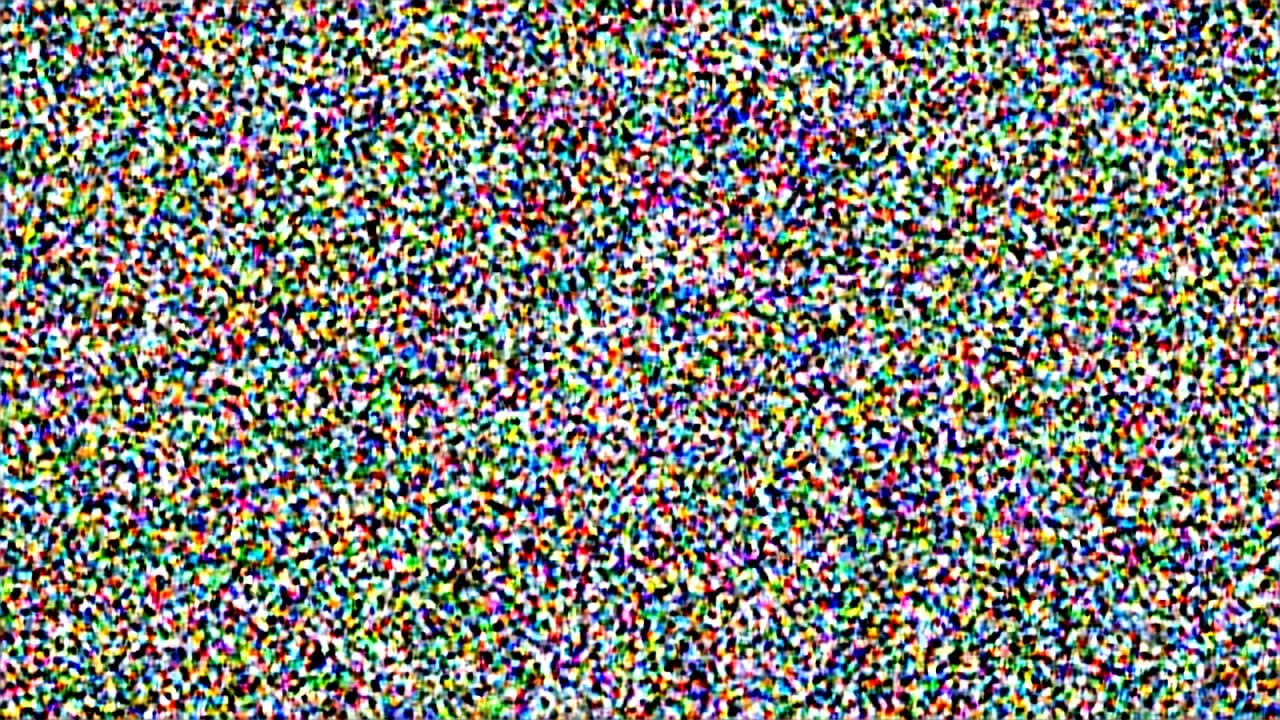
After step 1
The latent is still dominated by high-amplitude noise. No reliable subject is visible.
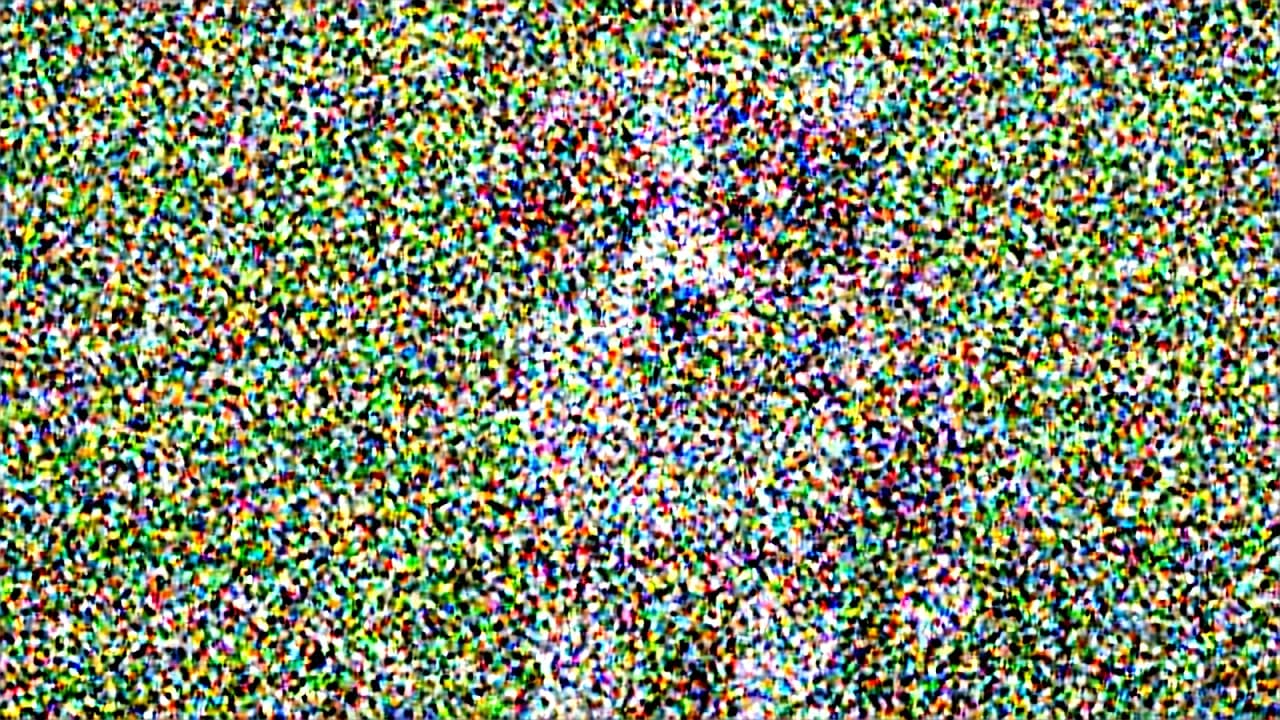
After step 3
A weak center-weighted structure appears, but the decoded image is still mostly noise.
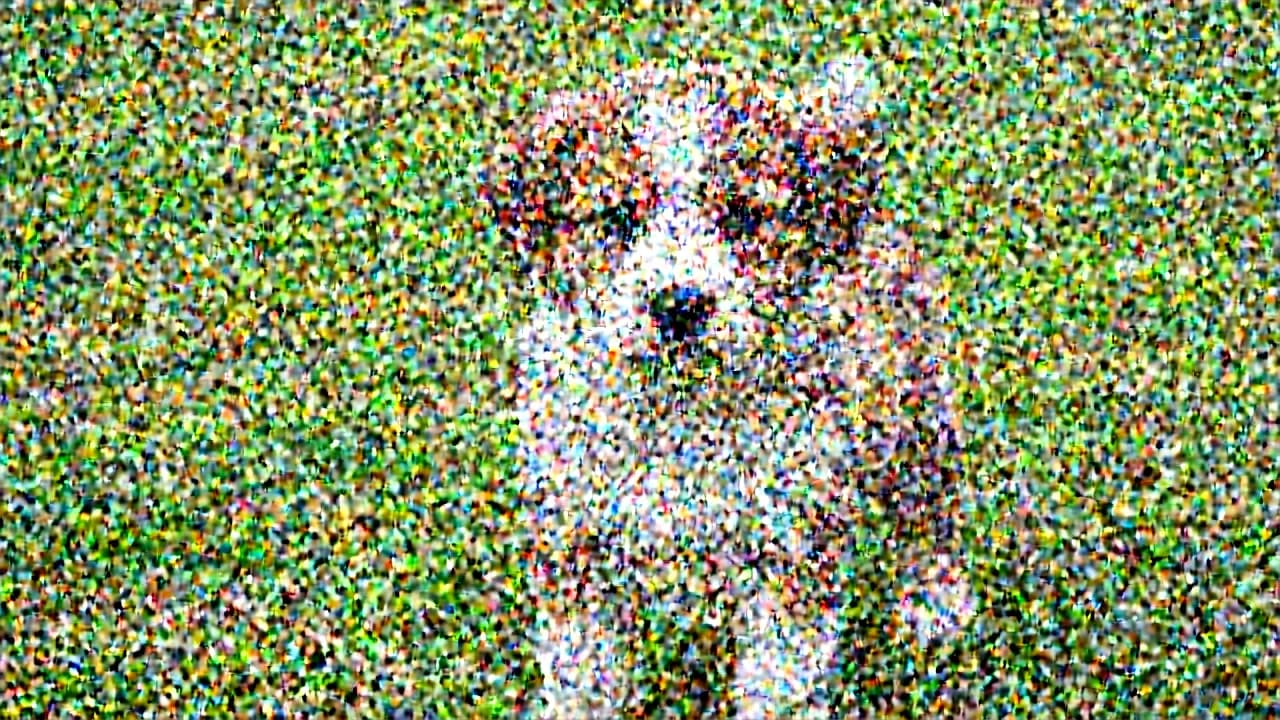
After step 5
The puppy, grass, pose, and camera framing become legible beneath heavy residual noise.
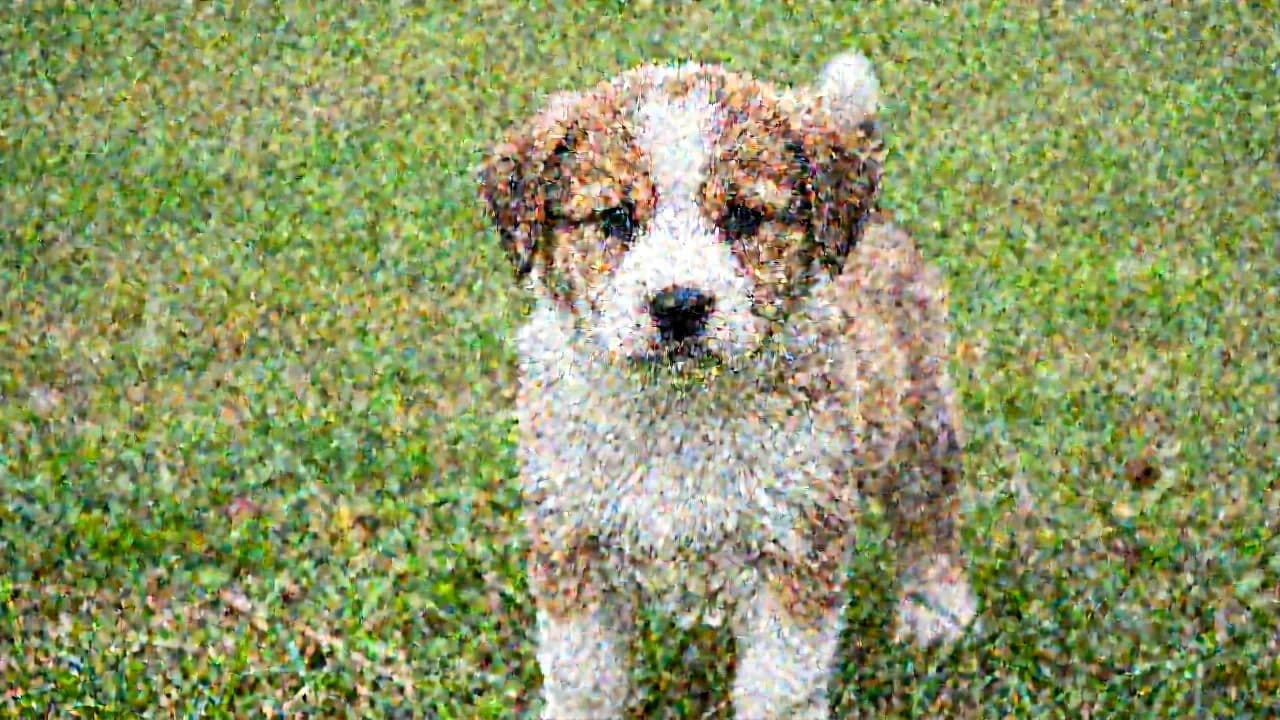
After step 7
Identity and composition are established. Fur and background remain visibly noisy.
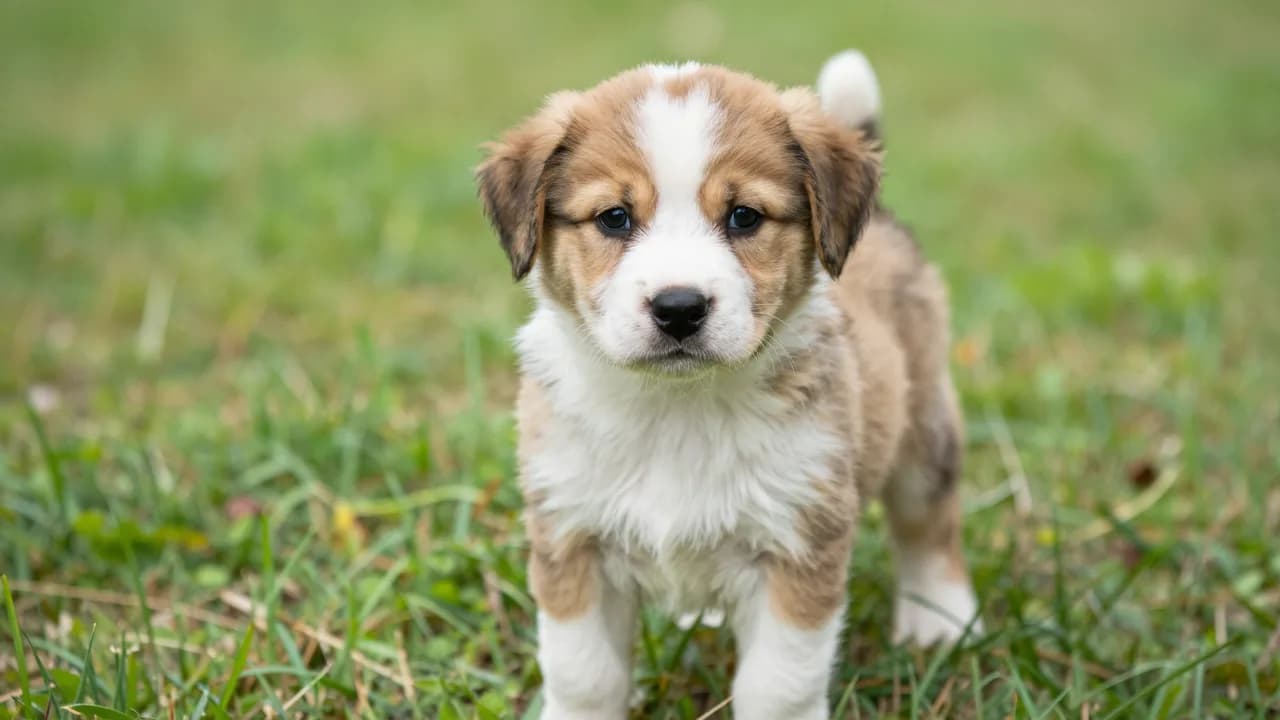
After step 9
The final move to zero noise resolves fur, grass, edges, and shallow depth of field.
Inside one sampling step
A sampling run is not one big prediction. It is a loop. At each step, the workflow has a current latent, a current noise level, and the text conditioning from the encoder.
- The sampler hands the current noisy latent to the model.
- The model looks at the latent, the noise level, and the prompt conditioning.
- The model predicts a direction that should make the latent less noisy and more prompt-like.
- The sampler decides how large that move should be.
- The updated latent becomes the input for the next step.
This is why steps, sampler, and scheduler are separate controls. The model predicts useful direction. The sampler applies the prediction. The scheduler decides which noise levels the loop visits along the way.
One-step intuition
What a sampler does
The sampler is the numerical solver inside the denoising loop. At a given noise level, the model predicts a direction or clean-state estimate. The sampler combines that prediction with the current latent and the next scheduled noise level to calculate the next latent.
Different solvers can use one prediction, several recent predictions, or an added stochastic term. That changes truncation error and, for ancestral methods, the noise introduced between steps. With the same prompt, model, seed, and schedule, a different sampler can therefore produce a different image.
- Single-step methods use the current model evaluation to advance the latent.
- Multistep methods reuse information from recent evaluations to estimate the path.
- Ancestral methods deliberately add noise while moving to the next level, which increases variation.
- Model compatibility matters because distilled models are optimized around particular step counts and inference recipes.
Model versus sampler
What the scheduler does
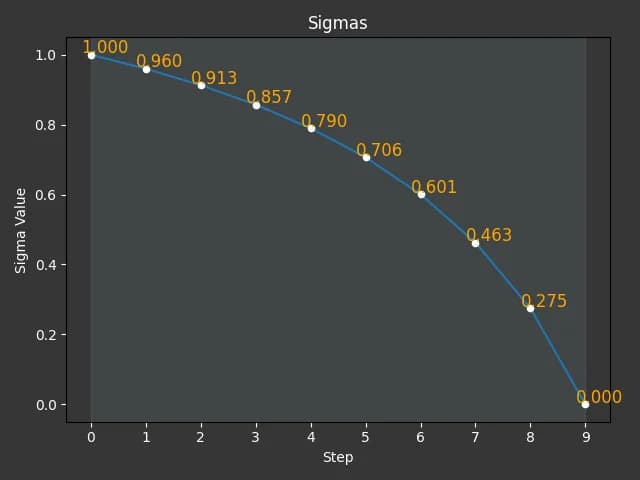
Simple
A gradual decline followed by a large final move from sigma 0.275 to zero.
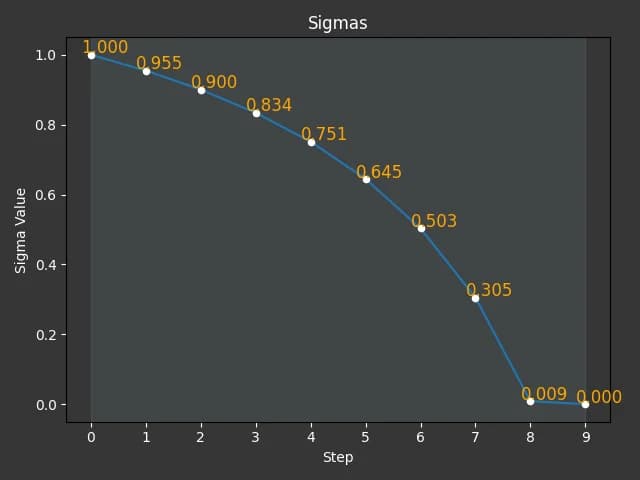
Normal
Similar early spacing, but it reaches sigma 0.009 before the final zero-noise step.
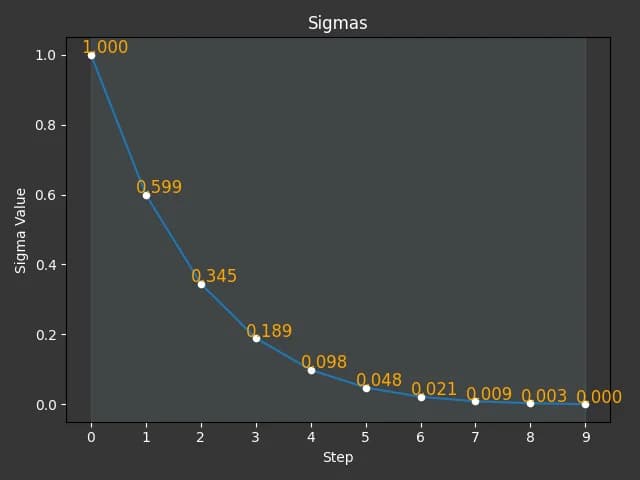
Karras
A large early drop, then many evaluations concentrated at low sigma.
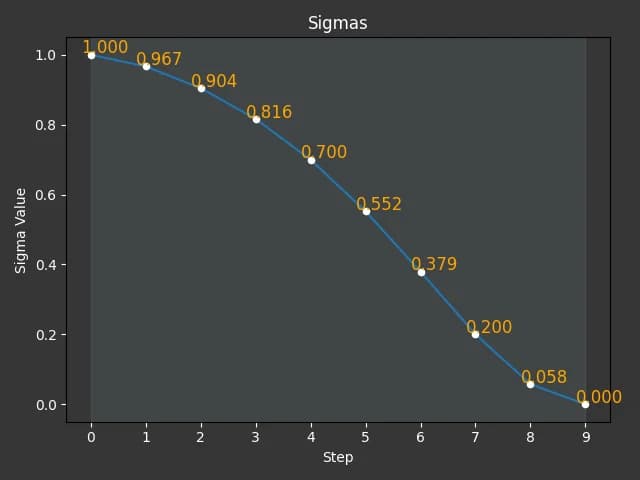
Beta57
A slower opening followed by a steeper middle and late descent.
The scheduler controls how noise levels change across the steps. In many workflows, sigma is a way of describing the current noise level.
High noise early means the model is still deciding big structure. Low noise late means the model is refining details.
Noise route
A scheduler that allocates more evaluations at high noise can affect composition and large shapes. One that allocates more evaluations at low noise can affect texture and finishing detail.
The plot and the generated image are two views of the same experiment. Karras makes its largest structural jump immediately and allocates most later evaluations near low noise. Simple and normal descend more gradually, but their last intervals differ sharply. Those spacings help explain why a fixed seed does not guarantee a similar composition when the scheduler changes.
Visual experiments: one setting at a time
To make the sampler controls less abstract, we ran the puppy prompt through a controlled ComfyUI test server with Z-Image-Turbo. The workflow used no LoRA. Each comparison keeps the prompt, model, VAE, text encoder, resolution, and most sampler settings fixed, then changes one value. The seed stays fixed for the steps, guidance, scheduler, and sampler sweeps. Only the seed sweep changes the seed.
| Control | Value |
|---|---|
| Prompt | A cute puppy |
| Model stack | Z-Image-Turbo, Qwen text encoder, VAE decoder, AuraFlow sampling shift 3 |
| Baseline sampler settings | Seed 353628450186049, 9 steps, CFG 1.0, res_multistep, simple scheduler, denoise 1.0 |
| Canvas | 1920 x 1088 |
Reproducibility note
Z-Image-Turbo guidance note
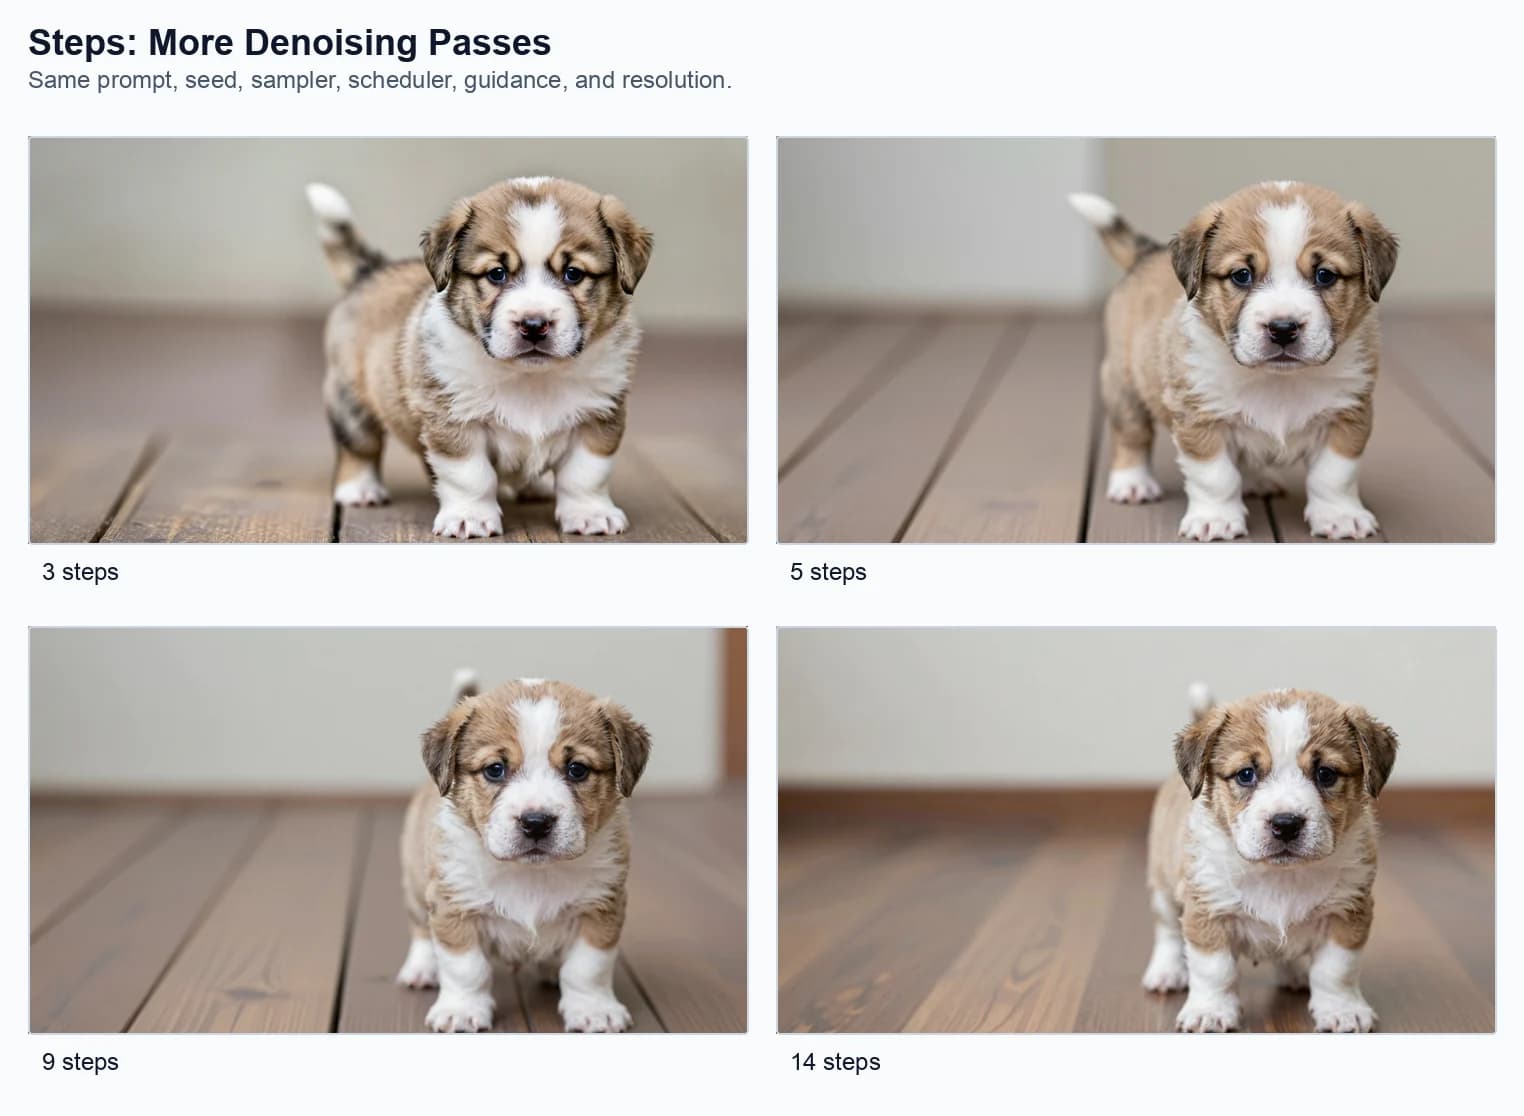
This step-count grid is different from the partial trajectory shown earlier. Changing the requested total from 3 to 5 to 9 to 14 makes ComfyUI construct a different set of noise levels. The 5-step result is not simply the first five states of the 9-step result. That is why composition can change even though the seed stays fixed.
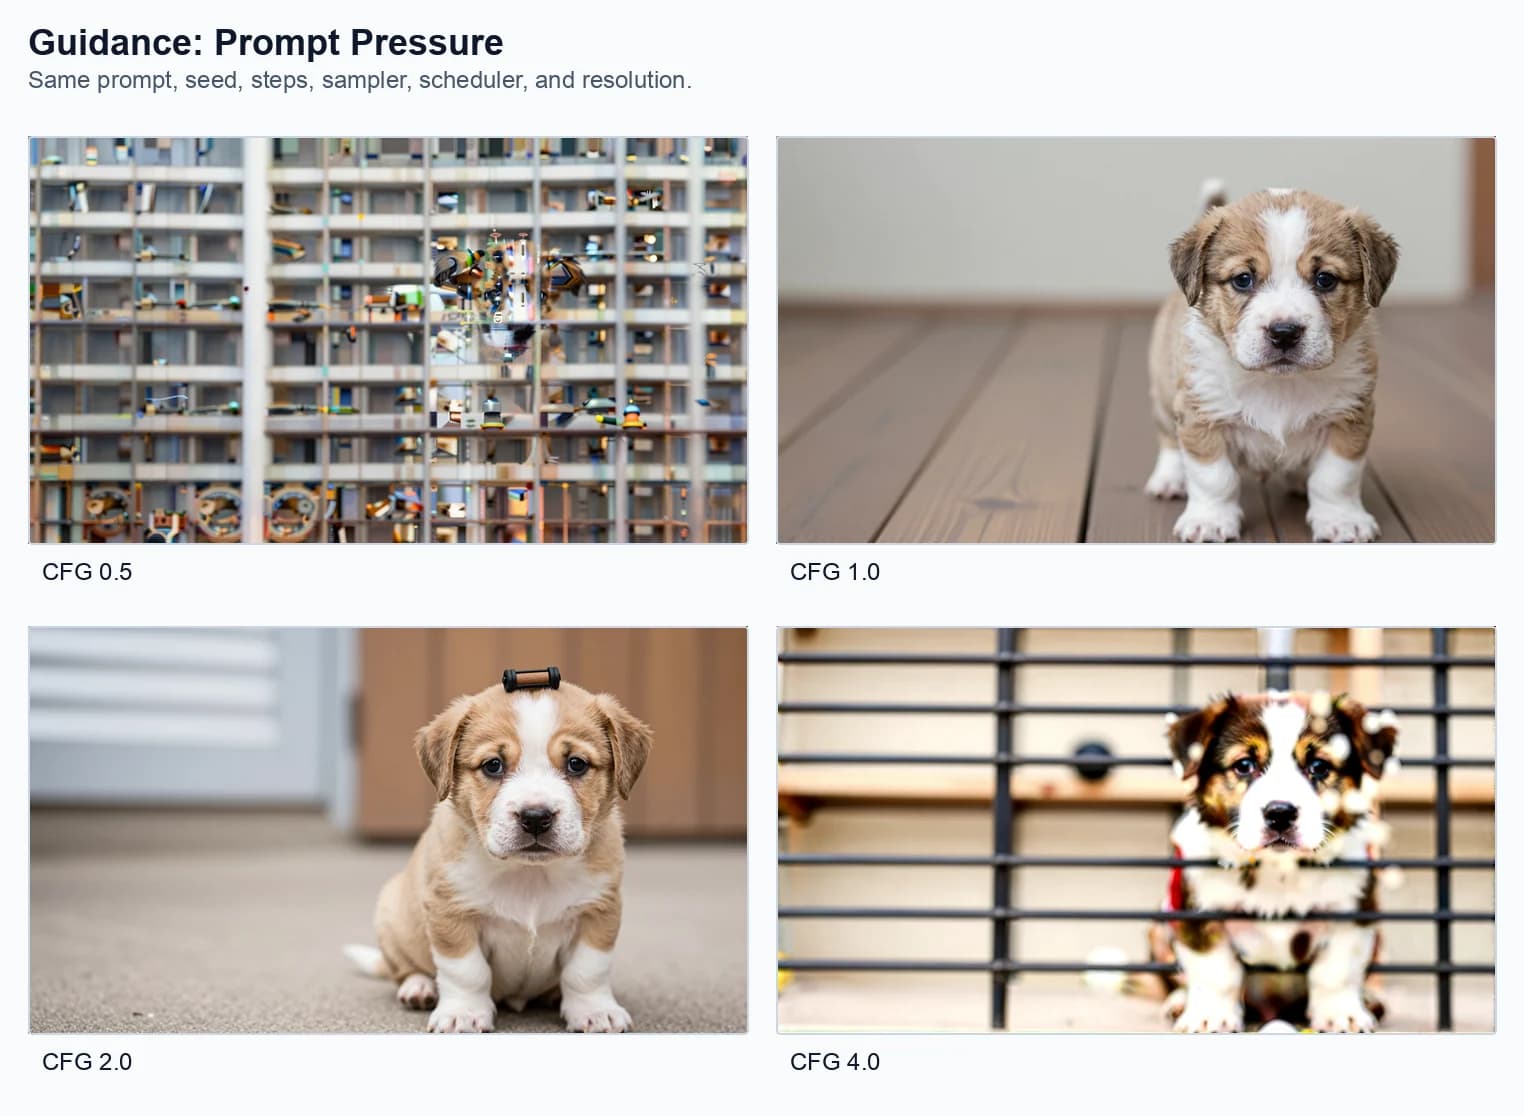
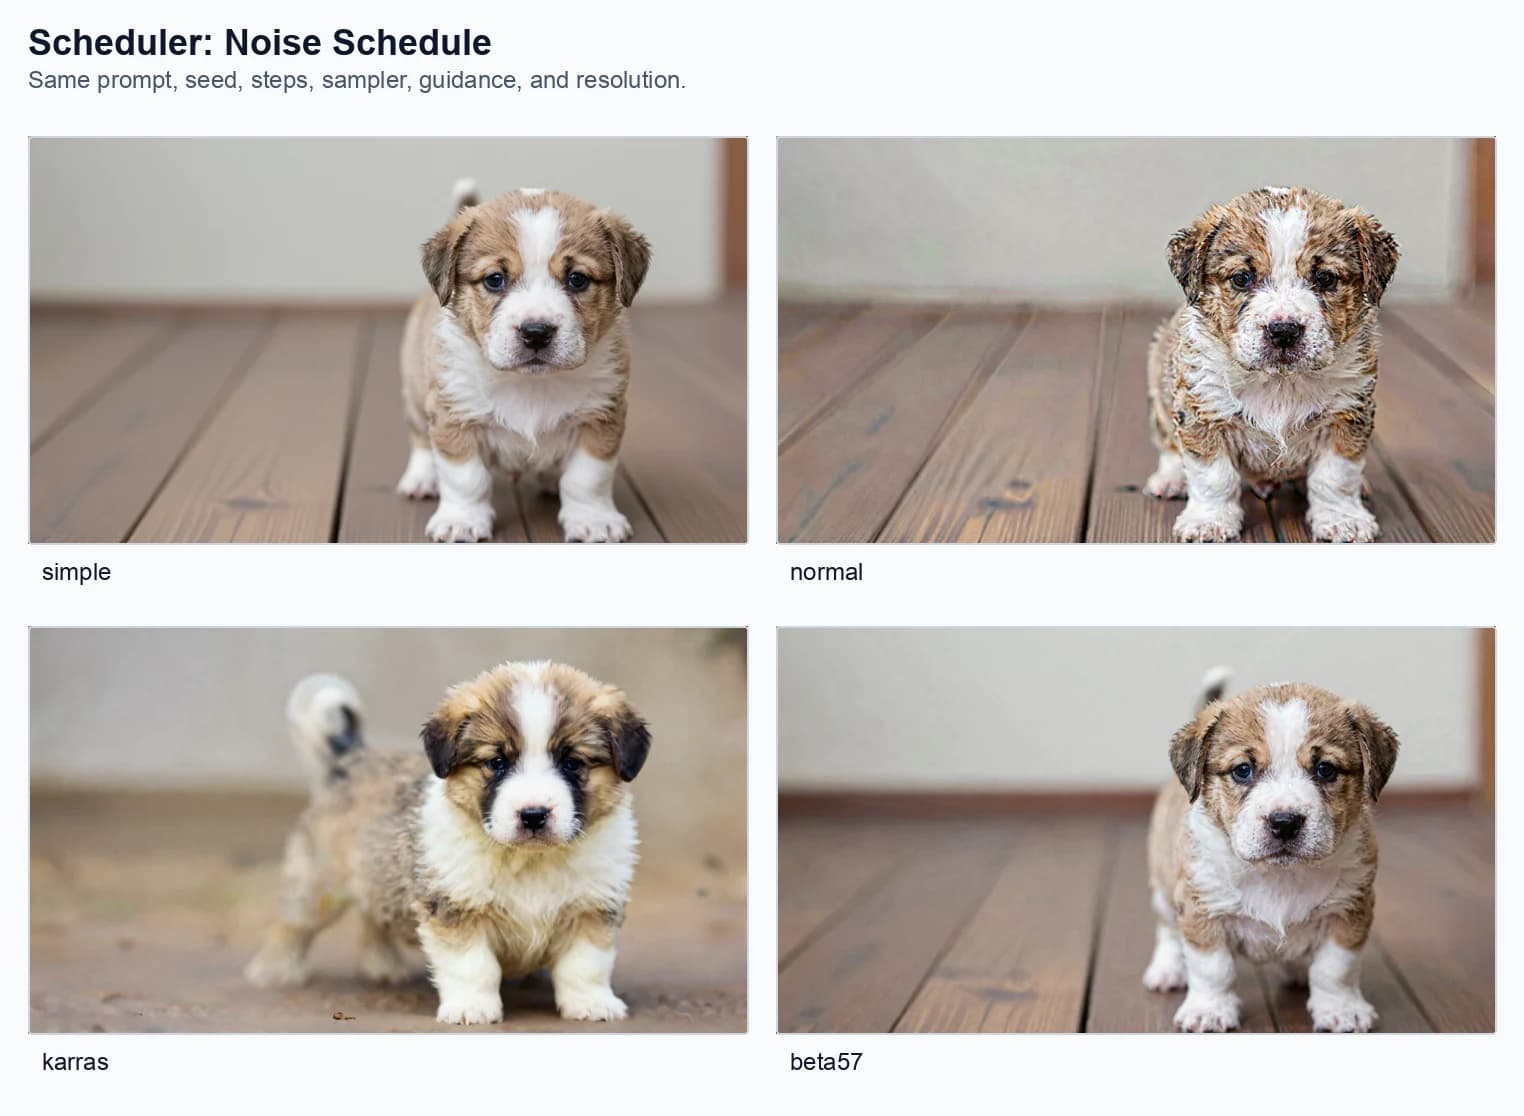
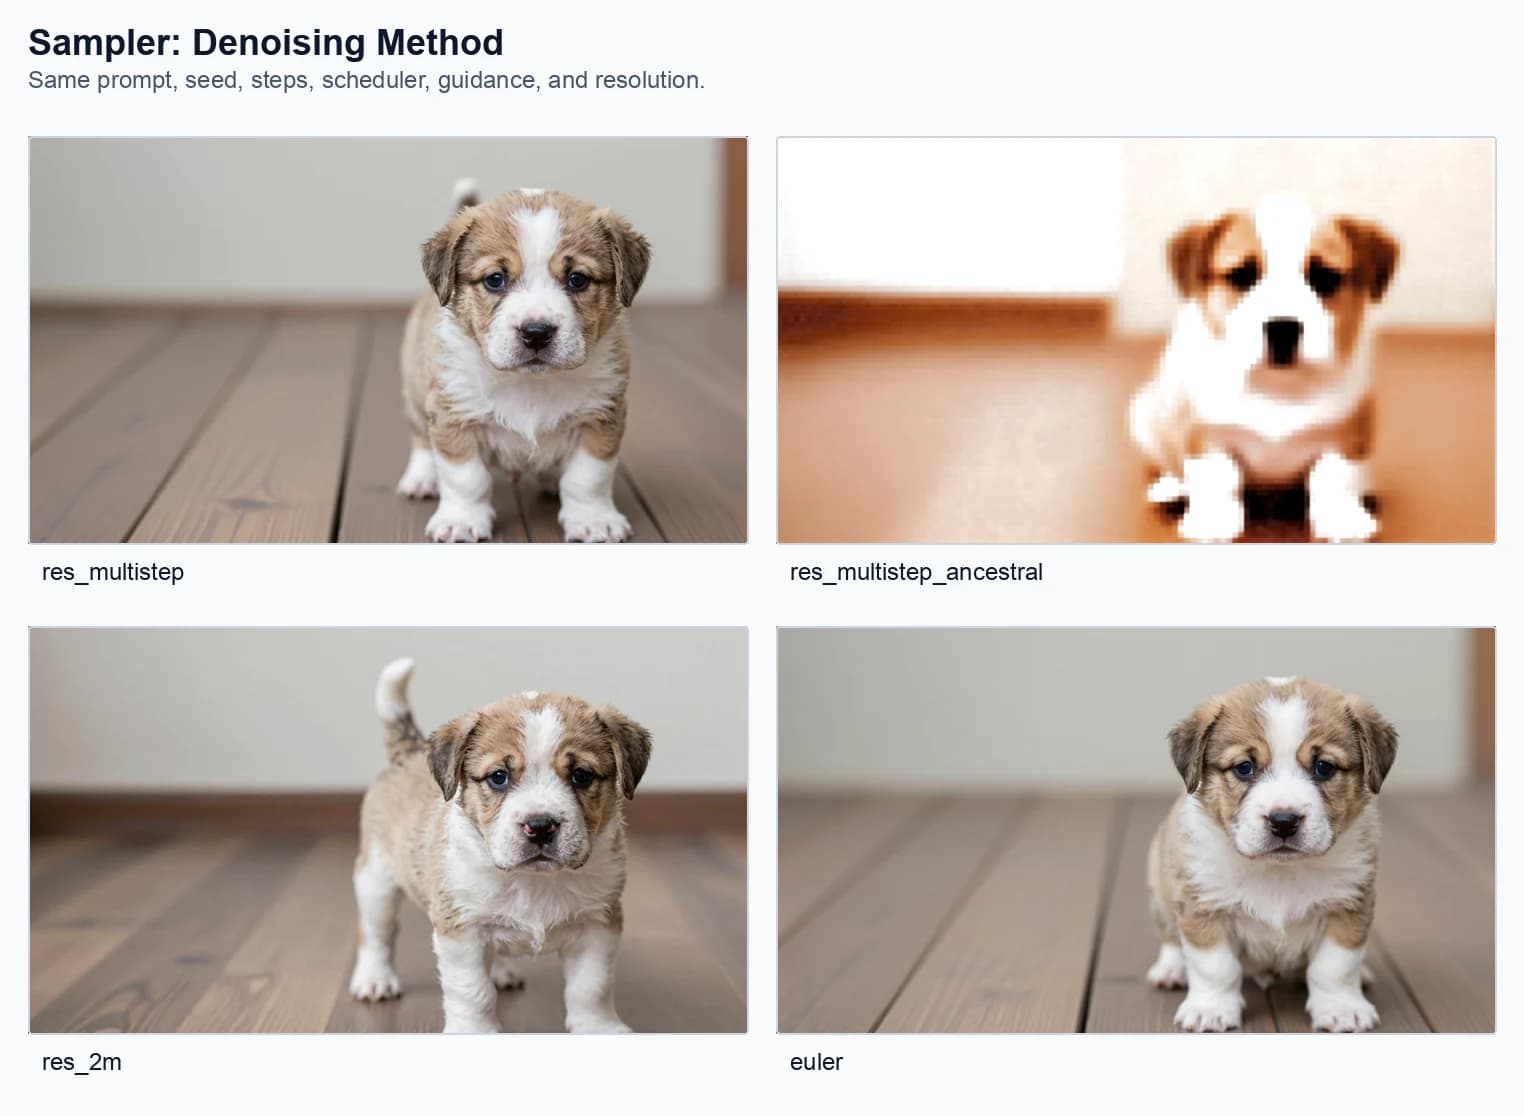
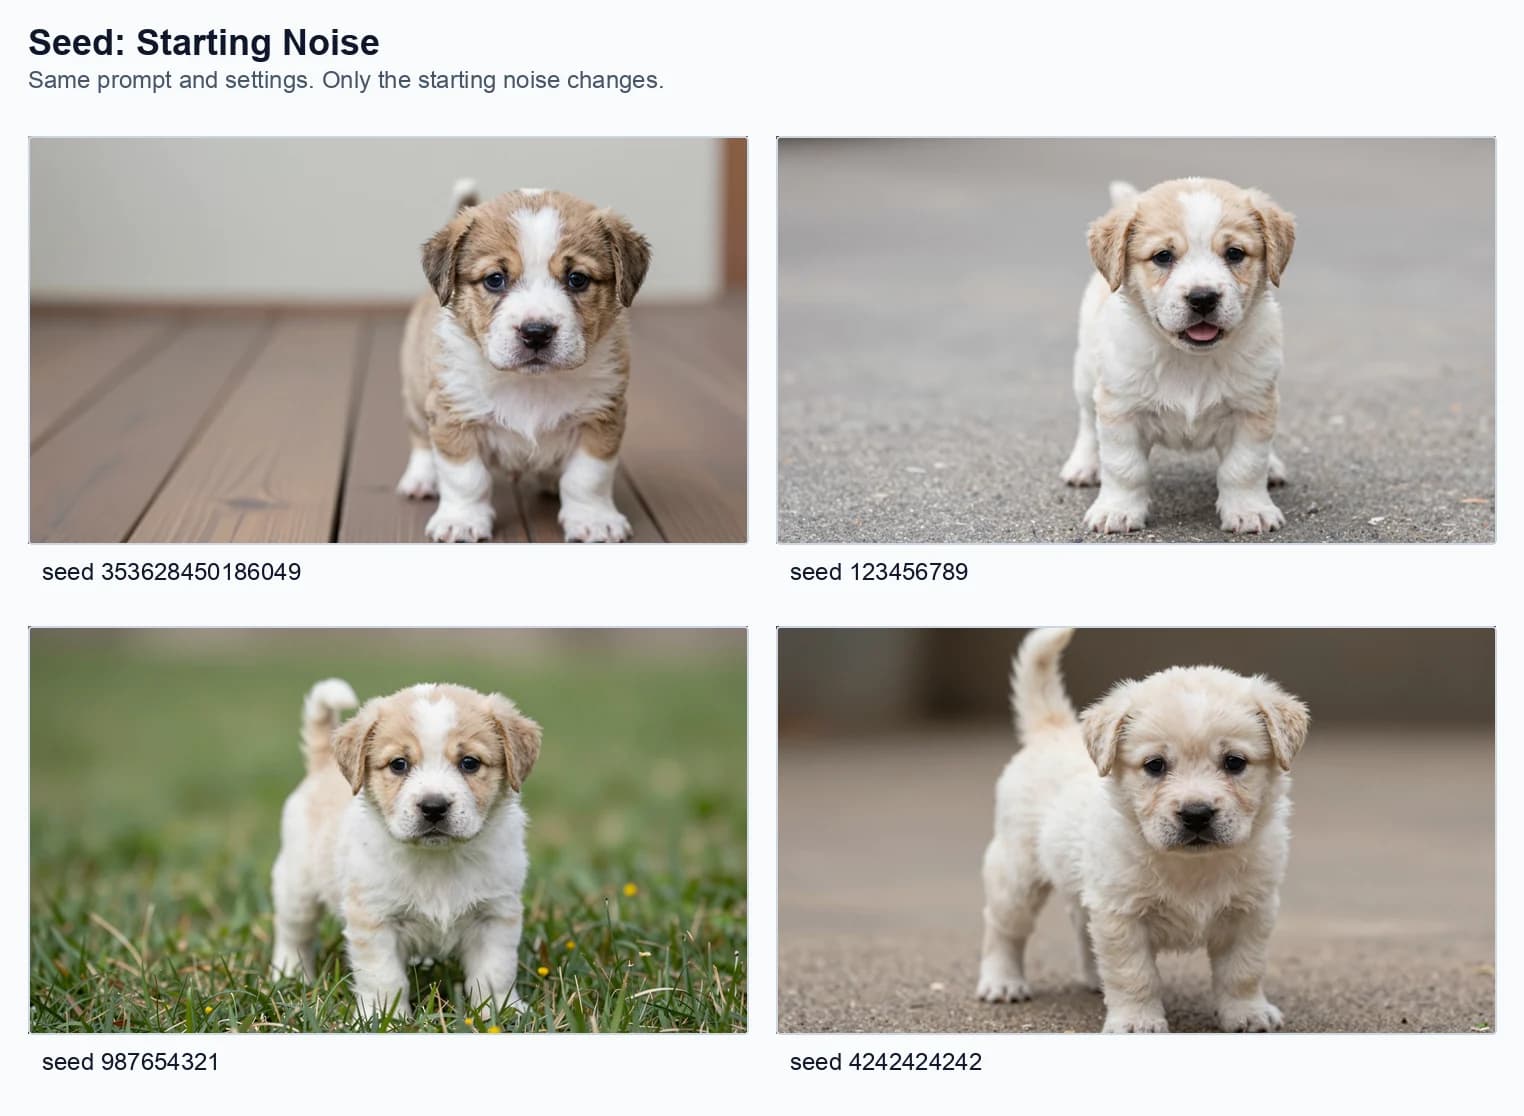
What to notice in the images
The surprising part is how much can move even when the seed is fixed. The prompt does not define one exact puppy. It defines a direction. The sampler settings decide how the model travels in that direction, and the resulting path can affect pose, background, sharpness, texture, and even whether the puppy stays coherent.
| Sweep | What changed visually |
|---|---|
| Steps | The puppy stays recognizable, but the camera position and body placement shift. At 3 steps the puppy is already formed; by 9 and 14 steps the image feels more settled, but the extra steps also change framing and floor perspective. |
| Guidance | CFG 0.5 loses the puppy into a strange grid-like scene. CFG 1.0 is the clean baseline. CFG 2.0 keeps the puppy but changes the room and pose. CFG 4.0 pushes too hard and introduces harsh contrast, bars, and a less natural result. |
| Scheduler | Simple gives the cleanest baseline in this run. Normal makes the puppy look gritty and noisy. Karras changes the puppy shape, ground, and lighting more strongly. Beta57 stays closer to the baseline but still changes fur texture and framing. |
| Sampler | Res_multistep holds the intended image together. Res_2m and euler still produce believable puppies, but with different pose and framing. Res_multistep_ancestral breaks down into a blocky, over-smoothed puppy-like shape. |
| Seed | Changing only the seed produces entirely different puppy identities and locations: wooden floor, pavement, grass, different face shapes, different body angles. This is why seed must stay fixed when testing another setting. |
What the grids teach
The most important lesson is that sampler controls are not cosmetic filters. They change the path the model takes through latent space. A different path can produce a different pose, background, texture, or level of coherence, even when the prompt stays the same.
- Steps: more passes are not automatically better. They give the process more chances to settle, but they can also move the image into a different composition.
- Guidance: the prompt can be too quiet or too loud. The cleanest result often sits between those extremes.
- Scheduler: changing the noise schedule can change whether the image feels smooth, gritty, stable, or compositionally different.
- Sampler: some methods fit a model better than others. In this setup, one ancestral sampler visibly breaks down while other methods stay coherent.
- Seed: changing the seed changes the starting noise, so it should be saved for exploration rather than mixed into controlled tests.
Important caveat
Sampler settings and what they change
| Setting | What it controls | What changes in practice |
|---|---|---|
| Seed | The starting noise. | Same seed makes comparisons fair. New seed explores a new composition. |
| Steps | The number of denoising passes. | More steps can refine, but they can also change framing instead of simply improving detail. |
| Guidance | How strongly the model follows the prompt. | Too low can lose the prompt. Too high can over-pressure the image into artifacts. |
| Sampler | The denoising method. | Changes stability, texture, framing, and sometimes whether the image holds together. |
| Scheduler | How noise levels are spaced over the steps. | Changes the route from rough structure to final detail, which can alter pose and texture. |
| Denoise | How much freedom the model has to change the latent. | 1.0 means full generation. Lower values preserve more input structure. |
| Resolution | The shape and size of the canvas. | Affects framing, memory use, render time, and sometimes composition. |
Seed
The seed controls the starting noise. If you keep the same seed and the same settings, you should usually get the same image. If you change the seed, the model starts from a different noise pattern.
That is why sampler tests should not change the seed at the same time. Otherwise you are no longer testing the sampler. You are testing a new block of randomness.
Seed intuition
Steps
Steps control how many denoising passes happen. Too few steps can look unfinished. Too many steps can waste time or push the image into an overworked look. Turbo models are often designed to work well with fewer steps.
In the puppy test, even low step counts made a recognizable puppy. The difference was not simply quality. The body position, background blur, and framing moved around as the step count changed.
Step intuition
Guidance
Guidance controls how strongly the model follows the prompt. Higher is not automatically better. Too low can drift. Too high can make the image look stiff, crunchy, or over-forced.
In this Z-Image-Turbo run, CFG 1.0 was the clean control. CFG 0.5 lost the puppy into visual confusion, while CFG 4.0 produced a harsher, more constrained image.
This is model-specific. Z-Image-Turbo was distilled for a guidance-free operating point. With the zeroed negative branch used here, CFG 1.0 means no extrapolation beyond the conditional prediction. A different model family may be trained and documented for a very different guidance range.
Guidance intuition
Denoise
In pure text-to-image workflows, denoise is often 1.0. That means full generation from noise. In image-to-image workflows, lower denoise values preserve more of the starting image.
Because this article uses an empty latent image, the experiment keeps denoise at 1.0. A denoise sweep would be more useful in a separate image-to-image example where there is an input image to preserve.
Denoise intuition
Why Z-Image-Turbo is a useful baseline
Z-Image-Turbo is useful for this kind of explanation because it is a fast image generation model built from the Z-Image family through few-step distillation. The official model card describes a 6-billion-parameter Scalable Single-Stream Diffusion Transformer, or S3-DiT. Text tokens, visual semantic tokens, and VAE image tokens enter one sequence rather than being processed in completely separate transformer streams.
The Turbo checkpoint is distilled to work in eight network evaluations in the reference pipeline. ComfyUI displays nine scheduler positions because the sequence includes the final zero-noise endpoint. This is a useful example of why UI labels, scheduler points, and actual model evaluations should not be assumed to count the same thing.
Few-step generation makes sampler and scheduler effects quick to test, but it also means the model expects a narrower inference recipe than a general 50-step base model. The point is not that every image model behaves like Z-Image-Turbo. The point is that this workflow exposes the major pieces clearly while giving us a documented baseline.
Most modern image generation systems still revolve around the same ideas:
- Text becomes conditioning.
- Noise becomes structure.
- The sampler controls the denoising path.
- The decoder turns latent information into pixels.
ComfyUI compared with asking ChatGPT for an image
When you ask ChatGPT to generate an image, the experience is much simpler. You type something likeCreate an image of a cute puppy sitting on a wooden floor.Then an image appears.
At a system level, the request still needs language interpretation, image synthesis, safety checks, output sizing, and product defaults. That does not mean ChatGPT uses this exact ComfyUI graph, Z-Image, or the same sampler. OpenAI does not expose seed, sampler, scheduler, or internal denoising settings in the ChatGPT image interface, so claiming an identical pipeline would be speculation.
The interface may rewrite or enrich your request, choose a model, choose image dimensions, apply safety rules, apply internal defaults, and return the finished result. That is excellent for speed. It is less useful when you want to isolate why an explicit guidance stress test broke the puppy or why one public scheduler made the fur gritty.
The difference is control.
ComfyUI shows the controls
- Model
- Text encoder
- VAE
- Seed
- Resolution
- Sampler and scheduler
- Steps, guidance, and denoise
ChatGPT hides the controls
- Cleaner user experience
- Less setup
- Fewer technical choices
- More conversational iteration
- Less direct access to sampler-level behavior
Control tradeoff
A better way to learn
Once you have seen the visual sweeps, the learning method becomes simple: do not change everything at once. Keep the workflow boring on purpose, then move one knob.
- Choose one short prompt.
- Pick one seed and keep it fixed.
- Keep the same resolution, model, VAE, and text encoder.
- Change only steps and save the results side by side.
- Reset to the baseline, then change only guidance.
- Reset again, then compare schedulers.
- Reset again, then compare samplers.
- Only after that, change the seed to explore new compositions.
This turns image generation from guessing into testing. The fixed puppy seed is useful because it lets you see what each setting does without the entire image changing randomly. The seed sweep is still useful, but it belongs at the end of the lesson, not the beginning.
What to remember
AI image generation is often presented as a mystery, but the underlying process is mechanical and learnable.
The model does not simply draw a puppy. It uses trained visual patterns, language conditioning, latent space, noise schedules, sampler behavior, and decoding to arrive at an image.
Once you understand that, prompts become only one part of the craft. The real control comes from understanding the machine underneath.
Sources
Primary papers, model documentation, and the reproducibility record behind this explanation.
- Experiment manifest records the fixed baseline and every one-variable sweep shown above.
- High-Resolution Image Synthesis with Latent Diffusion Models introduces diffusion in a learned latent space with perceptual compression and cross-attention conditioning.
- Denoising Diffusion Probabilistic Models describes the foundational iterative denoising formulation.
- Learning Transferable Visual Models From Natural Language Supervision explains CLIP-style contrastive language-image representation learning.
- Z-Image: An Efficient Image Generation Foundation Model documents the Z-Image architecture and training approach.
- Official Z-Image-Turbo model card for architecture, distillation, evaluation count, and reference inference settings.
- Classifier-Free Diffusion Guidance defines the conditional and unconditional prediction combination exposed as CFG in many interfaces.
- Elucidating the Design Space of Diffusion-Based Generative Models for separating model, sampling, and noise-schedule choices.
- Flow Matching for Generative Modeling introduces the vector-field training view used by flow-style generative systems.
- OpenAI image generation documentation documents the public image interface and exposed controls without implying an undocumented internal sampler graph.
Keep reading
Related articles
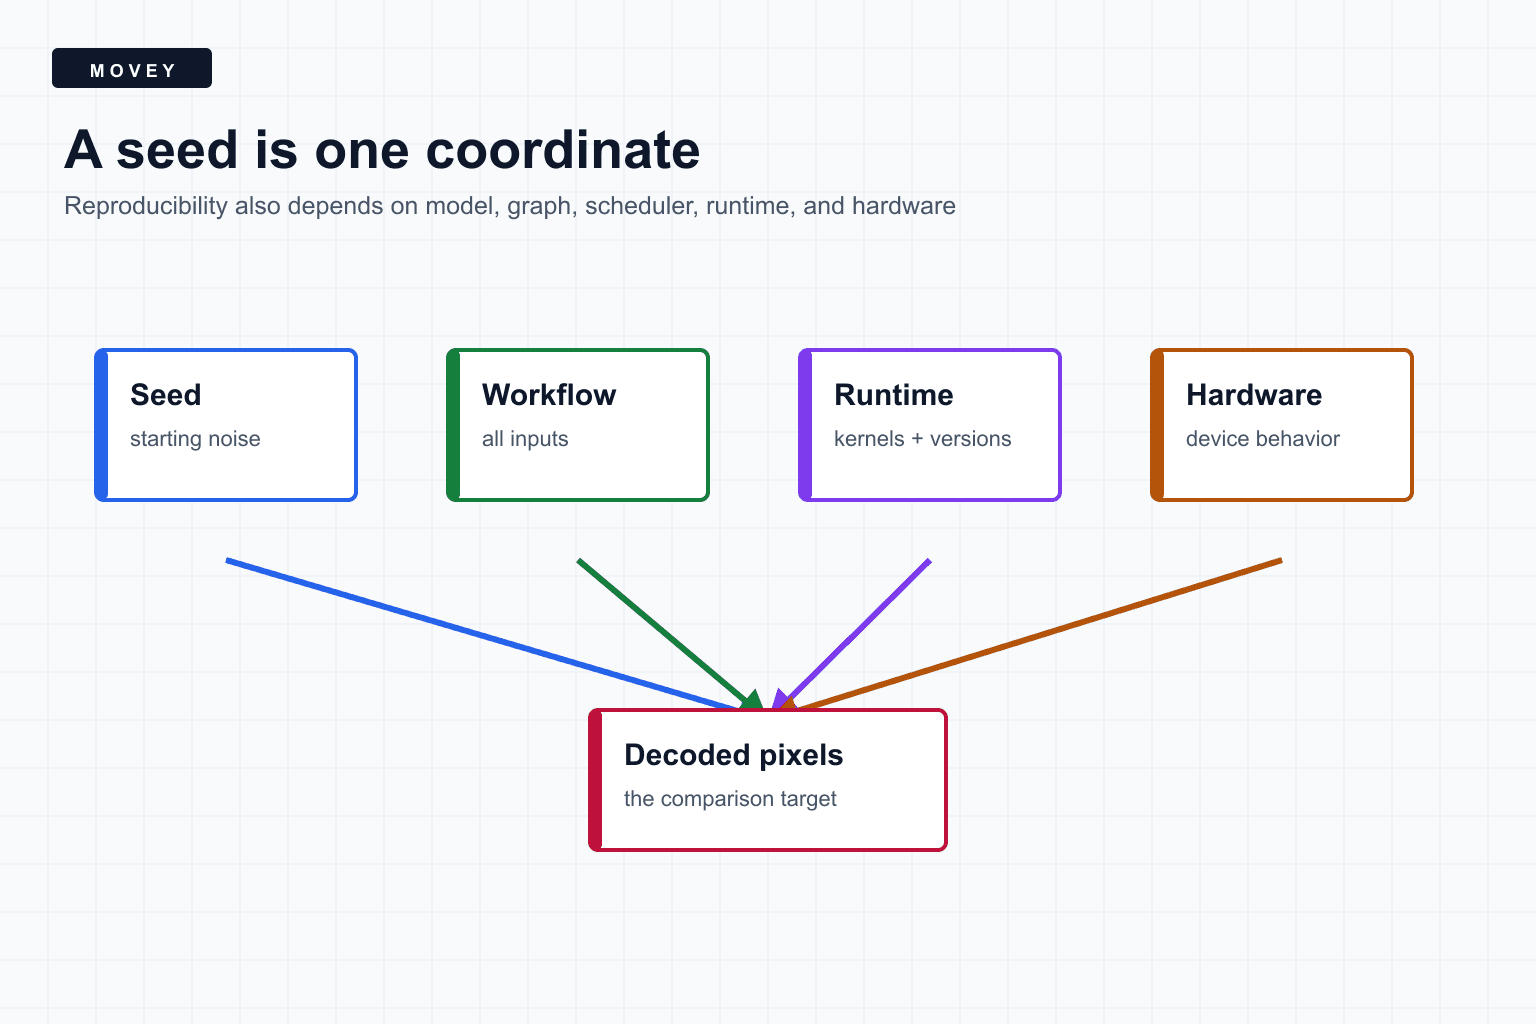
Why the Same Seed Can Produce a Different Image
Learn what an image-generation seed actually controls, why fixed seeds can diverge, and how to build a reproducible ComfyUI manifest using a controlled test-server experiment.
ComfyUI Is Code You Can See
Learn how ComfyUI turns Python-backed operations into a typed visual graph, how workflows execute and cache, and how to debug and reproduce node-based AI pipelines.
Next: turn understanding into better creative control
Movey is built around controlled AI creative workflows. Use Director when you want to plan scenes, keep references consistent, generate motion, and shape a final cut instead of relying on one prompt.